General Mesh Simulation
发布于:2024-11-21
Function Description
Style3D supports solving Mesh created in external software such as Maya

1. Garemnt Skeletal Mesh Actor Converted to Style3D Assets
1.1. Splitting a mesh as a fabric in Maya
Characters and garments are split.
Attention
Fully skinned Mesh, such as wrist guards, tight underwear, shoes can be split to the body, and are all considered fabric colliders in the fabric solver.
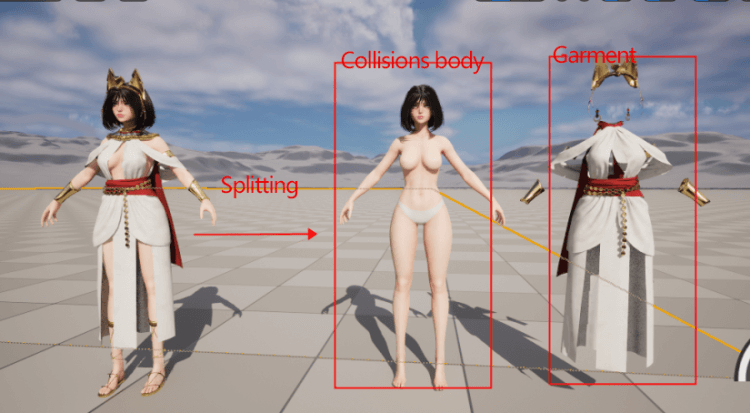
Get the Mesh of the garment.
Attention
Garment Mesh needs to have skin weights, import into UE to generate skeletal mesh actor.
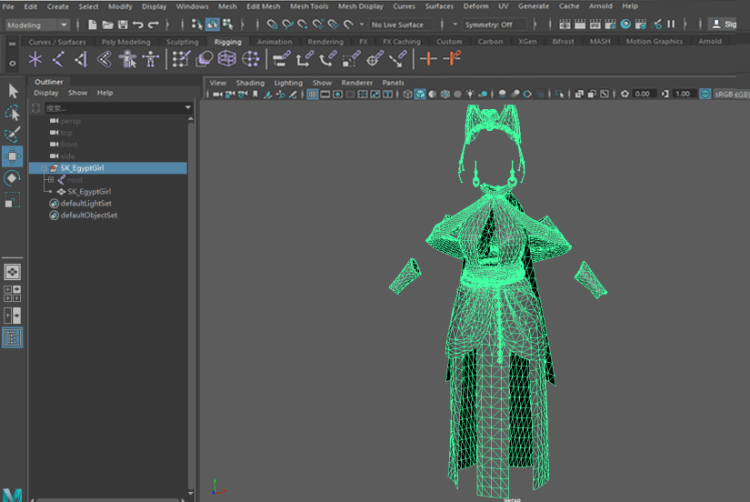
1.2. Garment Mesh Specification
The garment mesh obtained from the above splitting needs to be normalized for easy program solving.
Request | Instruction |
Weighted with a skin | Garment mesh needs to be converted to skeletal mesh actor in UE, and the skin information on the garment mesh can be used for skin solving and blending and other functions. |
All solution meshes have UV | All garment meshes used for solving need to have UV |
Single layer | Mesh as solution mesh without thickness, side and back mesh can be removed |
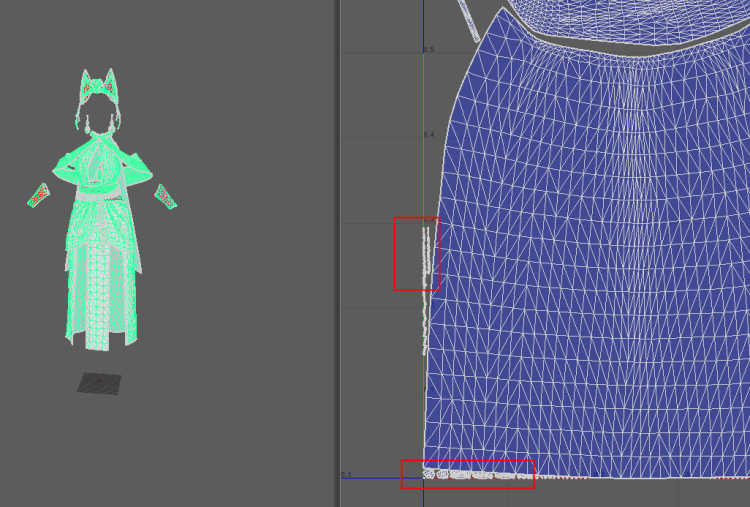
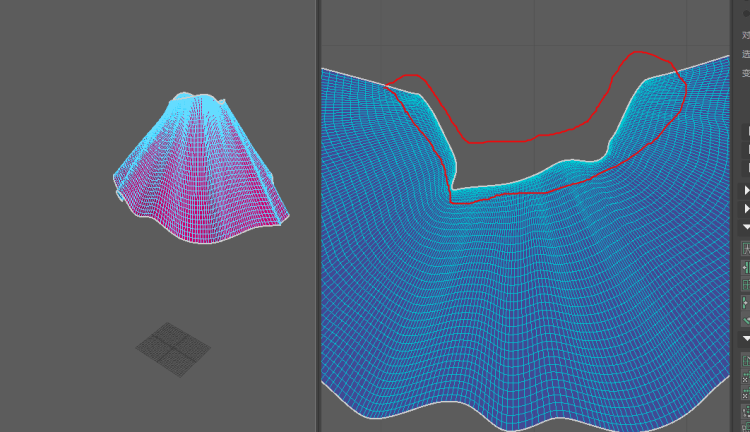
UV shape close to Mesh | Tools such as UV Straighten and Swell Brush should not be overused, as the UV shape deviates too much from the original mesh shape. Keep the particle mesh size in the UV shape close to the original mesh size. |
No fine mesh | UV block area greater than 0.01
|
Single mesh particle area greater than 10-7 Individual particle mesh area cannot be too small and lead to mesh loss after entering the UE |
This part of the specification is only used for solving, the user rendering of the high-mode specification can be developed by themselves, the detailed description of the see Mesh Proxy
After creation, import characters and garments into UE in FBX
1.3. Conversion to Style3D assets
Select the garment skeletal mesh and right-click Style3D Actions_Create Style3D Asset to convert the skeletal mesh into a Style3D asset
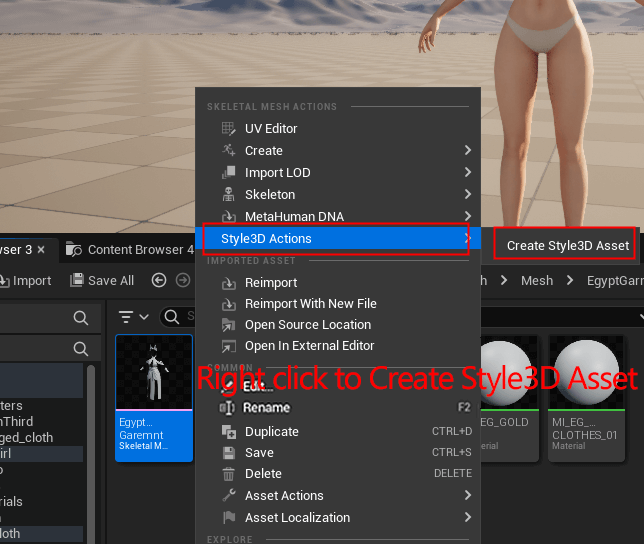
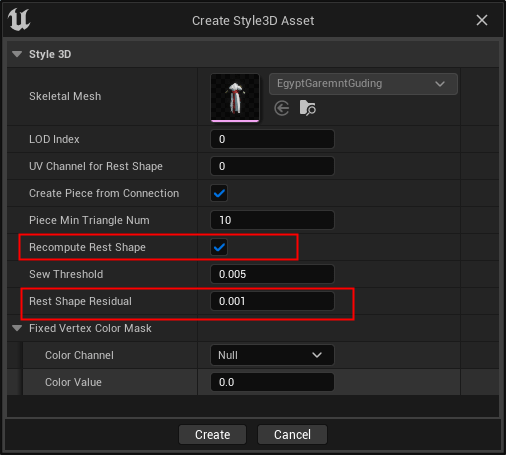
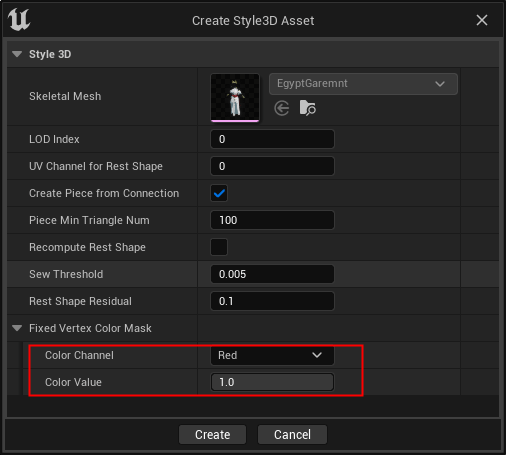
Conversion pop-ups
Style3D | |
Skeletal Mesh | Skeletal mesh to be converted to Style3D fabrics |
LOD Index | Converted to the LOD of the mesh selected for the fabric, default 0 |
UV Channel for Rest Shape | The UV block of the skeletal mesh is used to create a garment plate, and the UV channel used to generate the garment plate is configured here. |
Create Piece from Connection | Splitting a small plate from a mesh Section
Comment |
Piece Min Triangle Num | The minimum number of triangles in a plate, below which the plates are merged. |
Recompute Rest Shape(Importance) | Recomputing UV shapes The closer the UV block shape is to the original mesh, the better. Too much straightening, expanding, and contracting UVs will affect the solver effect of the created fabric. When the UV shape of the mesh is modified drastically, you can check this box to let the program recompute the UVs to create the solving plate instead of using the UVs. |
Sew Threshold | Vertex spacing less than this threshold is automatically stitched, it is recommended to leave a certain distance between unconnected meshes during asset creation. |
Rest Shape Residual | Recalculate the error of the plate, the smaller the value, the smaller the error |
Fixed Vertex Color Mask | Fixed Pin Area Vertex colors can be drawn in Maya for vertices with fixed pins. Configure the vertex information here to generate fixed pins in the transformed asset. |
Color Channel | |
Color Value |
|
1.4. Check for successful creation
Generate self-defined Style3D garment assets in the resource browser after successful creation

Attention
Creation Failure Tip
The fact that Style3D assets are generated in the Content Browser does not mean that they have been successfully created. You need to pay attention to the bottom-right corner to see if there is a warning message that the triangular areaa is 0.
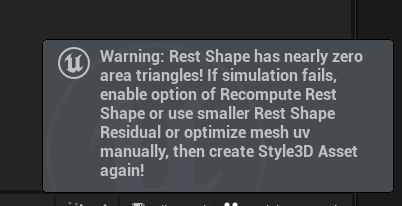
Due to the strict validation conditions, the prompts cover all cases of failure in addition to the partially successful creation of the prompts. Therefore, there is no hint that the creation was successful, and there is a hint that further validation is required.
Verification Method:
Mount the created Style3D asset to the character, record the cache to verify that the garment is simulated, and if it is simulated properly then it is successful creation.
Fix Method:
If the garment does not move while recording, the creation fails. Follow the prompts to configure the generation parameters or repair the UV again.
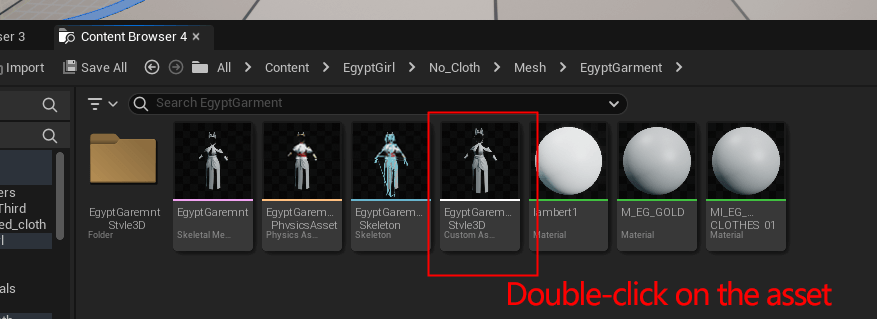
2. Modifying Style3D Asset Properties
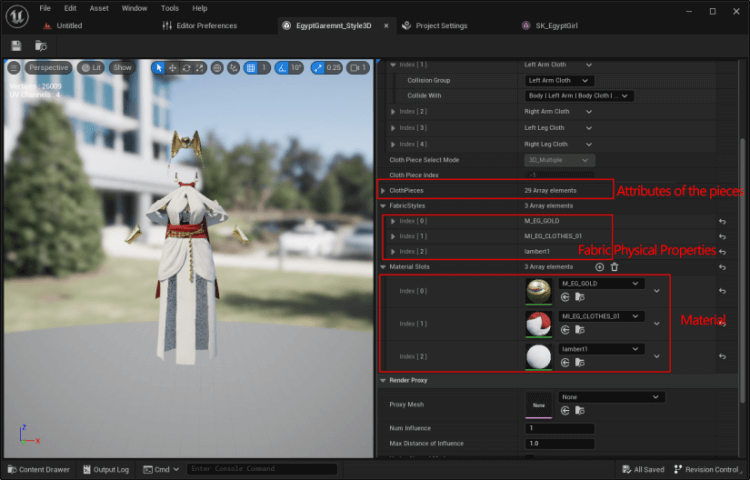
Double-click the asset to modify the physical properties of the fabric, material, and other related parameters in the Garment Panel
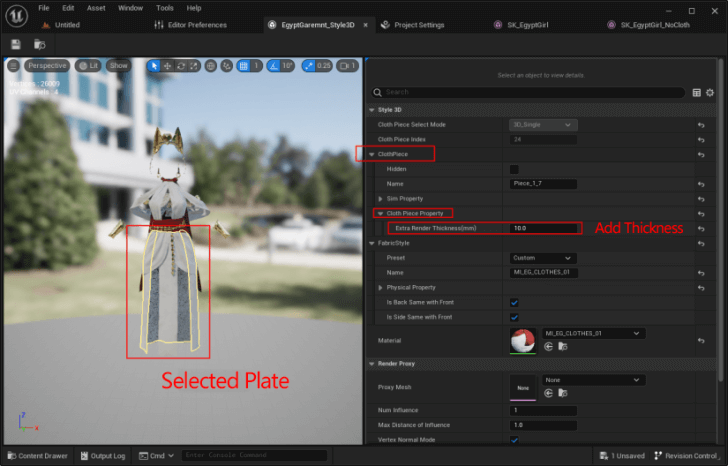
Add plate thickness (optional)
Add converted garment to the component for simulation
3. Addition of Fixed Pins
Fixed pin function can be in the simulation so that the apex adsorbed on the human body, to achieve a stable fixed effect similar to the skin, suitable for the garment on the close, easy to fall off the part of the
To add a pin to Maya
Find the Vertex Color Tool
Use the draw vertex color tool to draw colors for the vertices of the garment mesh that require fixed pins.
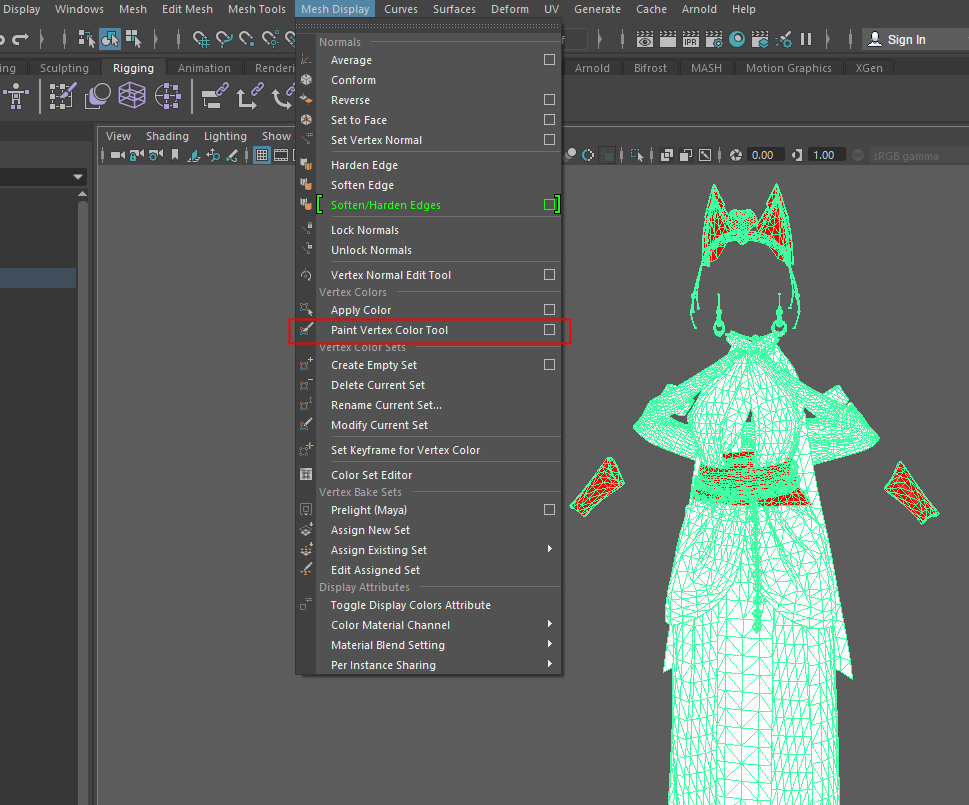
Setting the color
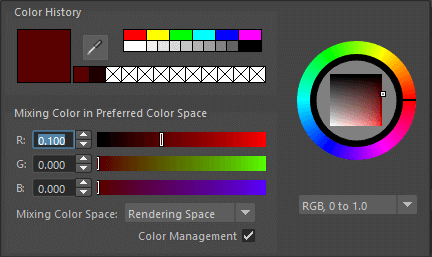
Before drawing the color of the fixed pin area, it is recommended to draw all mesh vertex colors as black (RGB: 000), and then draw a single channel value of 1 for the fixed pin area.
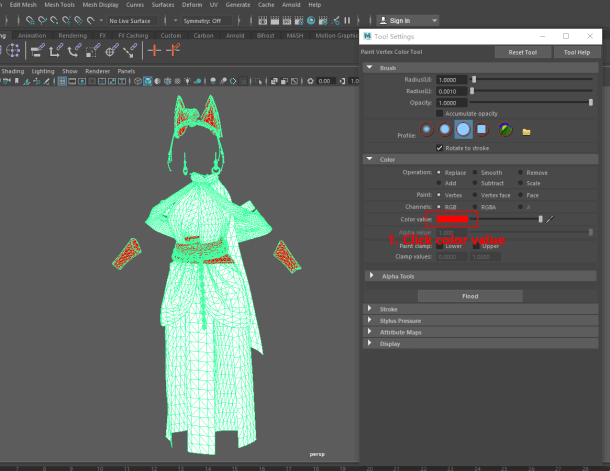
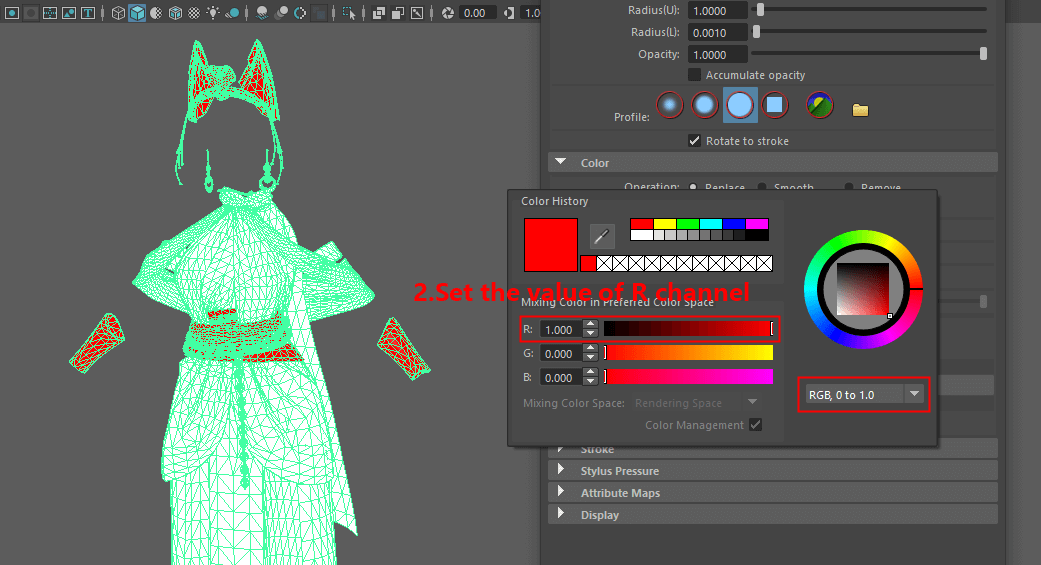
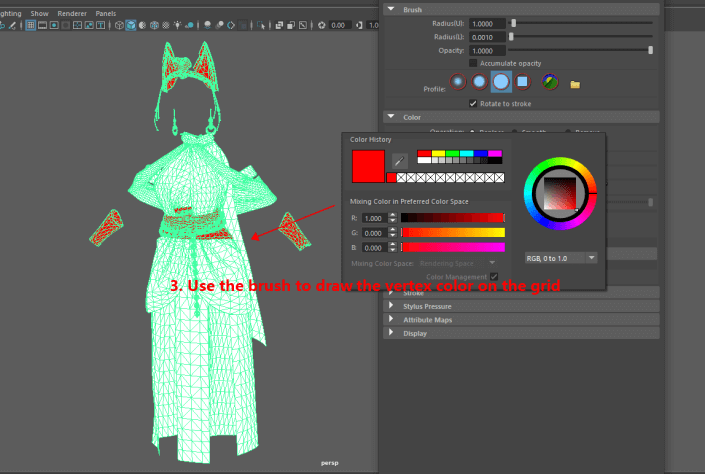
Export FBX after drawing.
Import into UE and set Fixed Vertex Color Mask when converting to Style3D assets.
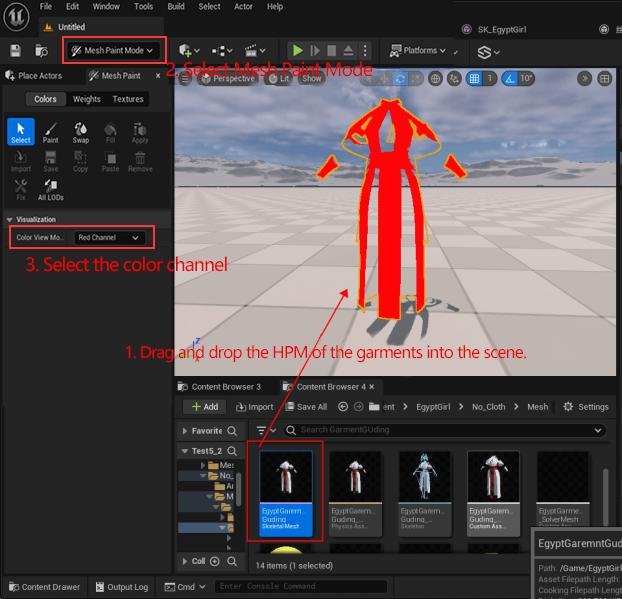
Viewing Mesh Colors in UE
Drag the garment bone mesh actor into the scene, use Mesh paint mode, select the garment, set to R, G, B three different color channels can view the vertex color.
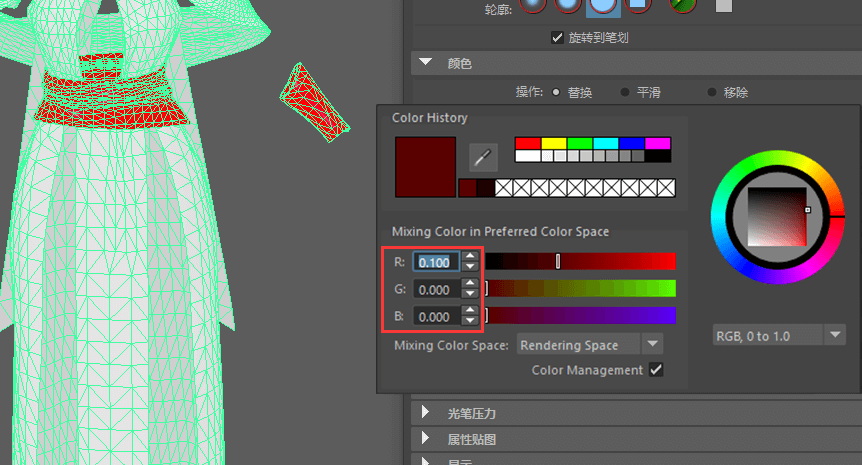
Problems easily overlooked
The value of the three RGB channels in the pure white area is also 1. At this time, when setting the fixed-pin channel, setting the value of the Red channel to 1 will result in all the white plate area becoming fixed-pin.
At this time to avoid repainting, you can set the G channel value to 0 in the conversion pop-up window to generate the fixed-pin region, to ensure that the fixed-pin region is unique within a single channel.
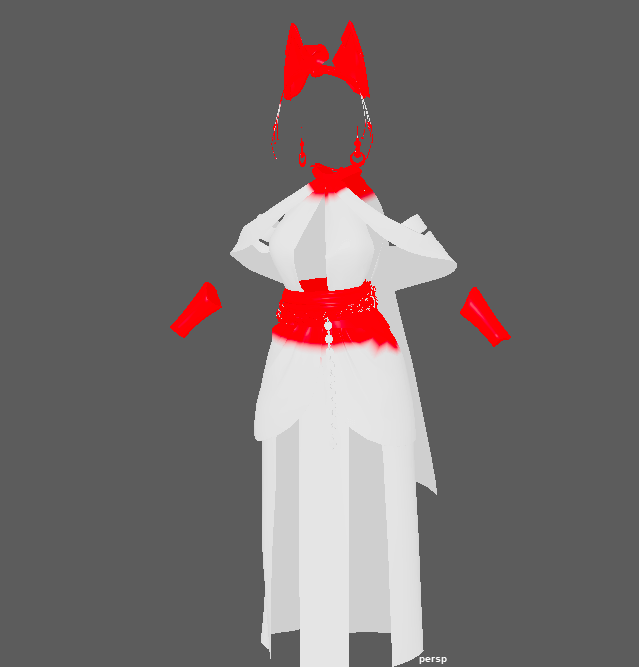
Common Issues:
1. Mesh dispersion during simulation in UE
Reason:
When the skeletal mesh actor is directly transformed into fabric, the Mesh directly lacks stitching relationship, and the single Mesh will fall off by gravity
Solution 1:
Set the Sew Threshold when transforming, the vertices below the threshold will be automatically stitched together.

Solution 2:
In Maya, areas with small mesh spacing do vertex merging, and areas prone to dropping add fixed pins.
Comment
