AI Snapshot(V7.1.265)
发布于:2024-09-04
Purpose:
Using AI technology, match the facial features of virtual models with real human faces, enhance the realism of model skin, and quickly obtain real-life fitting results. This provides users with a more authentic, personalized, and convenient experience, applicable in e-commerce for new releases, fashion design, entertainment, and enables uploading real human photos for personalized virtual clothing customization.
Operation Path:
Tools▶ 3D Snapshot ▶ AI Snapshot
Operation Instructions:
Parameter Settings
Switch real-time rendering mode to ray tracing rendering for quickly producing higher-quality image results.

In 3D snapshot images, add options for selecting multiple perspectives for AI-rendered outputs. Click "AI Render" to generate.

Image Size: By default, AI renders output at resolutions smaller than 2K but larger than 1K. If "4K Render" is not selected, the system checks if the image size is smaller than 1024x1024 pixels. If so, it updates the uploaded image size (scaling proportionally to ensure the shortest side is 1024 pixels). If the size is between 1024x1024 and 4K, it outputs according to the specified image size. If "4K Render" is selected, images are scaled to a maximum of 4096 pixels on the longest side.
→ To obtain a solid color background: Select a color on this page and turn off transparency, and select "3D Scene" in the AI output page.(The scene props in the 3D window need to be manually deleted or hidden first.)
→ To obtain a transparent background: Turn on transparency on this page and select "3D Scene" in the AI output page.
→ To obtain a 3D digital background: Turn off transparency on this page and select "3D Scene" in the AI output page.
→ To obtain a custom image or gallery image background: Transparency can be either on or off on this page, and select "Create Image/Scene library" in the AI output page.

AI Snapshot
Select models
AI-generated model images can be obtained in the following two ways:
(1) Customize models
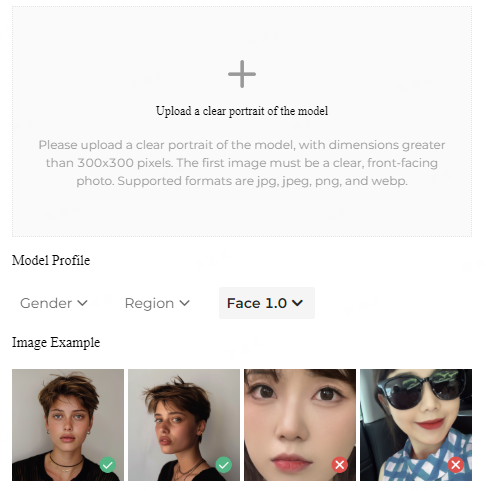
①Upload a clear portrait of the model
Click on Create Model ▶ Select Files to upload one reference image from your local device, and based on the model's features, select the gender and region. The AI will generate a new model face based on the reference image. You can upload multiple images from different angles to ensure consistency in the output faces. You can choose the face generation version: Version 1.0 focuses on facial blending, Version 2.0 emphasizes makeup similarity, and Version 3.0 prioritizes consistency across multiple angles. iWish defaults to Version 1.0, and selecting multiple photos will automatically switch to Version 3.0. When Version 3.0 is selected, expression options will appear, allowing you to choose the facial expression effect for the output.


Generated Result Example:

Requirements for Uploading Reference Image:
Size: The face area should be greater than 300×300 pixels.
The image should be a frontal view or within a 45-degree angle from the left or right, with clear visibility of facial features.
Avoid obstructions such as glasses, bangs covering the forehead, or other decorative items.
Ensure the entire face is visible, similar to a passport or ID photo, and not just isolated facial features.
The first image must be a clear frontal photo.

②Generate using the characteristics of digital humans
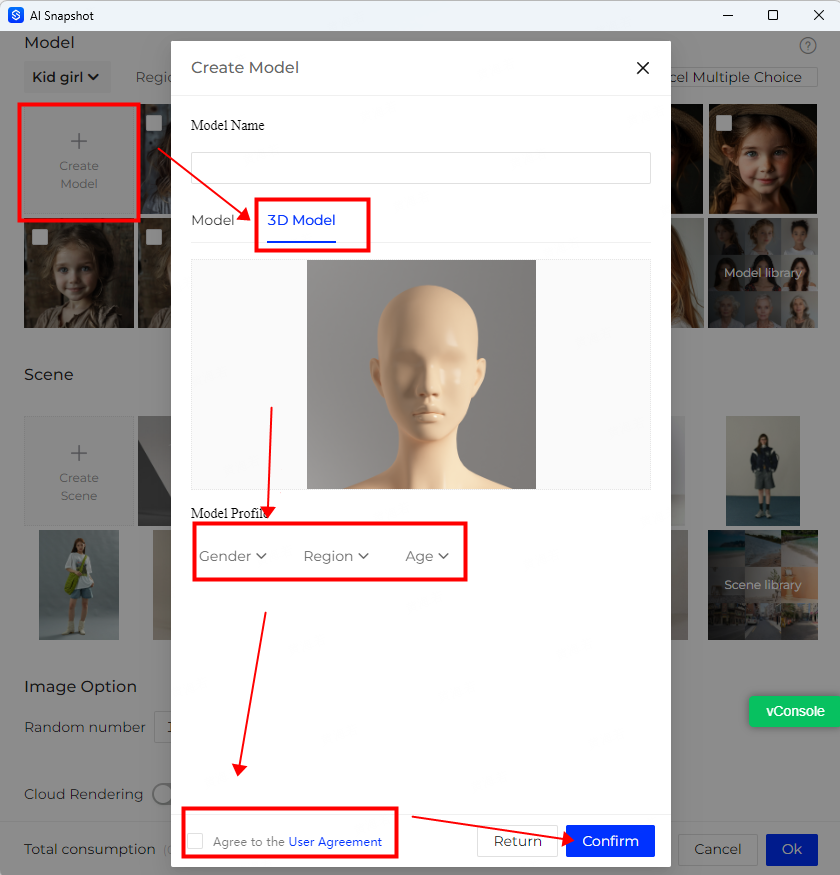
After clicking on "Create Model,"select "3D Model." Choose the "Gender," "Region," and "Age," and a new model will be generated based on the characteristics of the digital model.

Support gender and age selection: female model, male model, boy, girl
(The age function is only valid for 3D digital models)
Male and female models: Youth, Adult, and Senior
Currently, age selection is not available for boys and girls.
Generate case:
Youth Adult Senior

Region options include: Asia, Euro, Africa.
Skin color adjustment tips:
You can first adjust the digital model's skin color to be similar to the reference face.
The digital model's skin color offers several built-in color swatches for selection in the color panel.

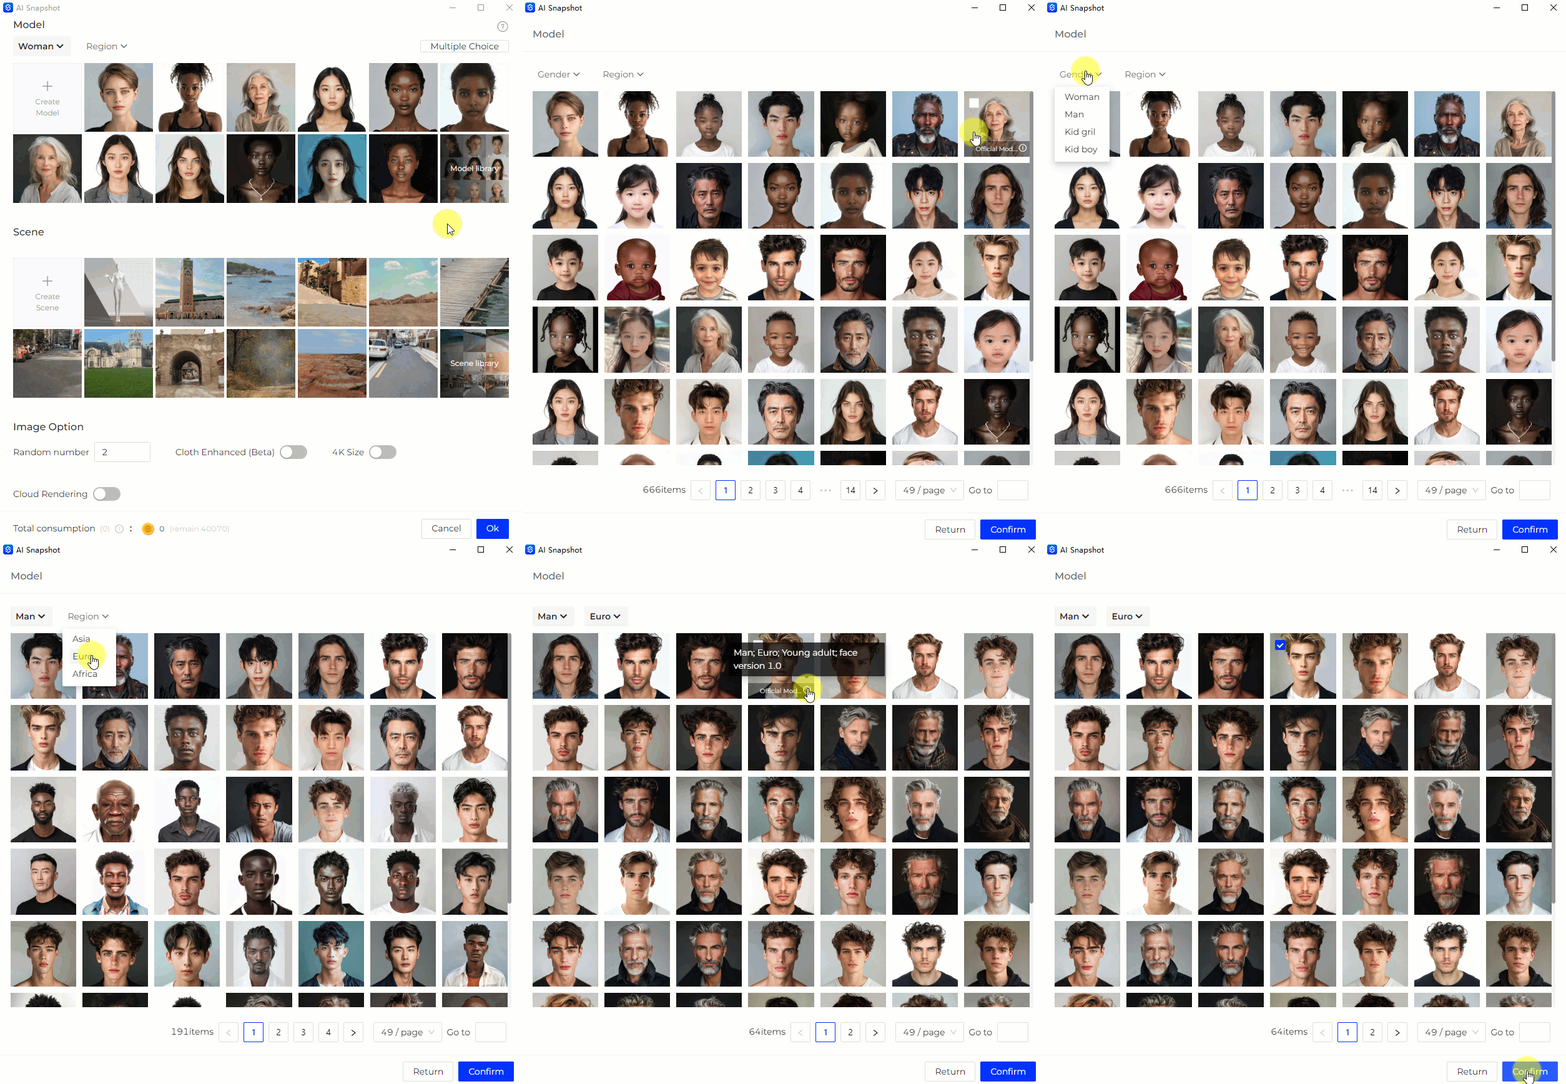
(2) Select an official preset model from the model library
New model library: Expands a large number of models to meet diverse needs. The model covers come with corresponding parameters (gender, region, age, face-swapping algorithm). There is no need to reset the parameters each time. The AI will generate a new model based on the characteristics of the selected model to help users quickly generate images and obtain real-person clothing try-on rendering results.
Multi-selection function in the upper right corner: Multiple faces can be selected at one time to generate multiple AI face results at once.

Case examples of generated results:

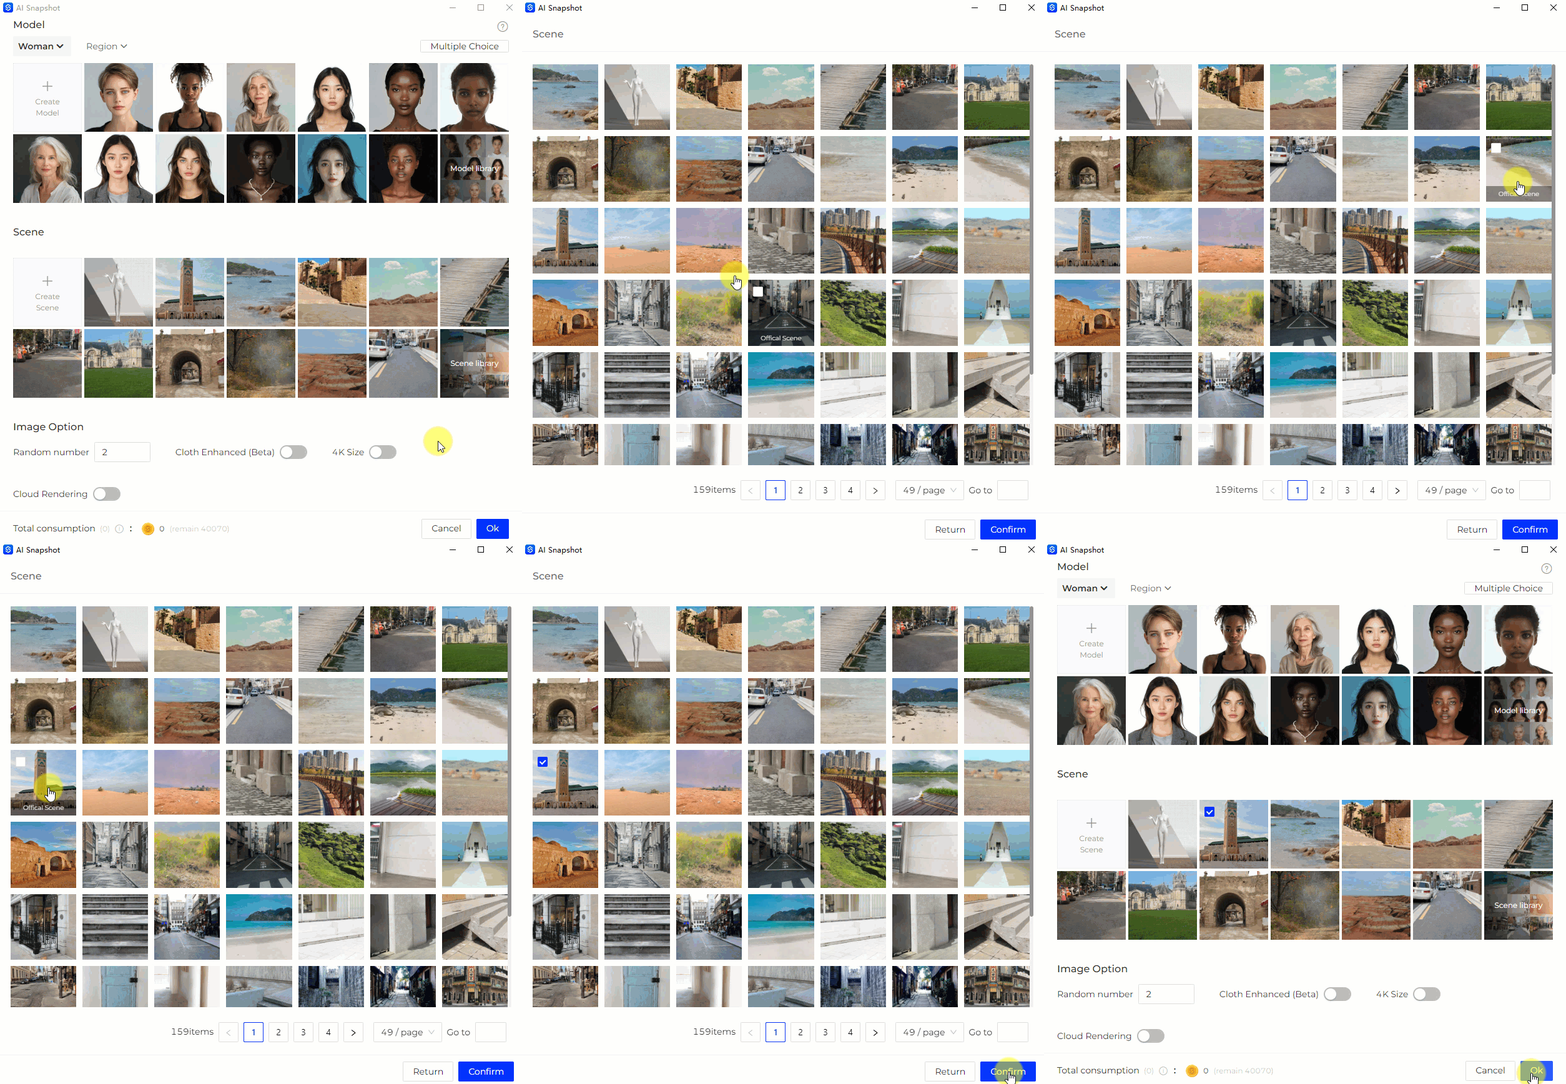
Select a scene
Expand a large number of scene materials to meet diverse needs.
(1) Customize the scene: You can select a reference background and generate a new background image according to the reference background
"Click on 'Create Scene' ▶ Select Files to upload 1 reference image from your local device. Choose the output size, and the AI will generate a new background image based on the reference background.
Inherit the 3D output aspect ratio: The output will follow the aspect ratio of the 3D output dimensions. The scene image will be cropped accordingly, and the person's position in the AI output will remain unchanged.
Inherit the uploaded scene image aspect ratio: The output will follow the dimensions of the scene image, and the person will be positioned based on their location in the scene image.
Inheriting the uploaded scene image aspect ratio supports re-editing the person's position and height.
Please pay attention to the size and format requirements for the uploaded reference image.

 Click the edit button in the upper right corner to open the scene editing window.

(2) 3D Digital Scene: Generates the background image for AI output results based on the 3D viewport scene.

(3) Select an official preset scene from the scene library
[Scene] ▶ [Official Preset Scene] has greatly improved effects, with stable backgrounds and more reasonable lighting and shadows.

Generated Result Example:

Image output options
Make the output images of higher quality
Random number of images: Increase the ability to generate multiple images at once. For each 3D image, the AI generates N different results. Eventually, N times the number of points will be deducted.
/image%20(28).png?st=gHw5-FN6GYuVRneWPl9dSYvL-27Sg-74PgymXfBixFH141w7Kxs-t_WSntWGTivcRLAp2ntvHYp8r3JlOJ-GWfDiCED7mscAGi8=)
Clothing Enhancement: Enabling this feature will allow the AI to optimize the craftsmanship of the 3D clothing, making it more realistic. There are three intensity levels to choose from, each corresponding to different degrees of fabric wrinkles.

4K Output: When this option is turned on, images with 4K clarity will be output. If the image size setting is less than 4K, the maximum side will be calculated as 4096, and it will be converted to 4K size according to the proportion. Enabling this function requires an additional 10 points for each image.
Cloud Rendering: When this option is turnethe AbIed on offline rendering results-generated image effect is generd on, portion. Enabling this function require an additional will cloud rendering voucher. By default, a 4-hour rendering voucher is used.
Generated Result Example:


Downloading Images from the official website
Official website ▶Applications▶ Online Tools▶ AI Apps, find the completed image and can view, regenerate, download, delete, and favorite.
Generating again will deduct AI credits again, but if cloud rendering has been used, it will not deduct cloud rendering credits again.
Favorites can be viewed in the list.


Reason for task failure prompt
Accelerate problem localization, adjust engineering and development positioning in real time
*Common failure issues:
When using a reference face, upload multiple perspectives at the same time where the face is not visible or the facial information is incomplete
Can be generated normally when using 3D faces
/image%20(15).png?st=7A8SpcM1edc9XloLZ5wP8SdAcqR4oCpZ4qc-CCGS0nZqxpCaILddabzcjVTBQ4s-Vx66ua02j5FDSqHG7hZw-P2k085re22oYKo=)
/image%20(16).png?st=XHPFBkJbxUG5ppRb3RFkfw0ejHsbxBbvyzW4-pG-661hHy7dHXtIyVIXwSqThXBWtl0_CZWn1hSdWbPbtlz3U_Y8abaXbV9J6HI=)
No model photography
Supports uploading only clothing without models, and can also be reinforced with pleats
Scenarios that do not require face changing but require AI enhanced clothing details
/image%20(12).png?st=w6NyfiBpRI7vs3OuSis3OekxFeROnHylYEVf88FF0WSItfbXnj9-xK_jgppgac_1zE9h0TcZVIGN69Fj3yHm5ukyZ8DbSoblKOI=)
/image%20(13).png?st=I8sqfU3BpRC5iFlr43DfYLXlfL_W_kaNkxUsbY_6OuC51IyntMk1WxymS62hLvq_di-nV12dlaPjOqIi3hUKkr-t9X773XEgCnM=)
/image%20(14).png?st=WcdqPlEHjftM-FqyJB9kgNjO5PQrh5X0BbuwWOdkdsL6i4rjMXAa4msyfQDK4xLb0D1AZY4Az3bjjlNtG9gVFxU17D67lJrlZgA=)
Practical Tutorial
Click the blue text to adjust the YouTube course link:
Applications and Tutorials for AI Snapshot